ICTFax Admin Guide
Table of Contents
-
- Introduction:………………………………………………………………………………………………………………………….
-
- Requirements to setup ICTFax server:………………………………………………………………………………………
- Server specs:…………………………………………………………………………………………………………………………
- Operating system:…………………………………………………………………………………………………………………
- Sip provider:…………………………………………………………………………………………………………………………
- Requirements to setup ICTFax server:………………………………………………………………………………………
- 3: Configuration:……………………………………………………………………………………………………………………….
- 4: Admin configuration:……………………………………………………………………………………………………………..
- Configuration of DID numbers:………………………………………………………………………………………………
- ADD new DID:…………………………………………………………………………………………………………………….
- Create DID,s in Batch:…………………………………………………………………………………………………………..
- 5: Extension Configuration:………………………………………………………………………………………………………..
- To Add New Extension:…………………………………………………………………………………………………………
- 6: Provider/Trunks:……………………………………………………………………………………………………………………
- 7: User Management:……………………………………………………………………………………………………………….
-
- Switching to User Account:…………………………………………………………………………………………………..
- 9: Fax Document:…………………………………………………………………………………………………………………….
- Add new Document:…………………………………………………………………………………………………………….
- New Document:………………………………………………………………………………………………………………
- Add new Document:…………………………………………………………………………………………………………….
-
- Fax Campaigns:………………………………………………………………………………………………………………….
- To configure campaign settings:…………………………………………………………………………………………….
- To Create New Fax Campaign:……………………………………………………………………………………………..
- Fax Campaigns:………………………………………………………………………………………………………………….
-
- Contacts:……………………………………………………………………………………………………………………………
- To configure user information:………………………………………………………………………………………………
- To Create New Contact:……………………………………………………………………………………………………….
- Groups:………………………………………………………………………………………………………………………………
- To Edit group information:……………………………………………………………………………………………………
- To Create New Group:………………………………………………………………………………………………………….
- Contacts:……………………………………………………………………………………………………………………………
- 12: To send Fax:………………………………………………………………………………………………………………………
- Send Fax:……………………………………………………………………………………………………………………………
Add Document:................................................................................................................................... 26- Receive Fax:……………………………………………………………………………………………………………………… 29
- My DID,s:………………………………………………………………………………………………………………………… 29
- Reports:……………………………………………………………………………………………………………………………. 30
1. Introduction:………………………………………………………………………………………………………………………….
ICTFax is an open source multi-user and web based software solution for service providers based on
open source angular and freewitch with the bundle of standard features.
Installation of ICTFax:
2. Requirements to setup ICTFax server:………………………………………………………………………………………
Server specs:…………………………………………………………………………………………………………………………
- Quard core 3GHZ
- Ram 4Gb
- Hard disk 200GB
Operating system:…………………………………………………………………………………………………………………
- CentOS 7.X
Sip provider:…………………………………………………………………………………………………………………………
• T.
- G 711 faxing support
- DID incoming number with fax support
3: Configuration:……………………………………………………………………………………………………………………….
-
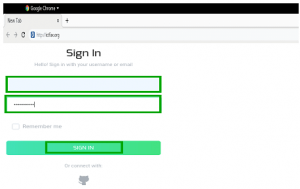
Open web browser
-
Enter domain name or ip address as URL
-
Login page will appear
-
Enter login and password and click on sign-in button
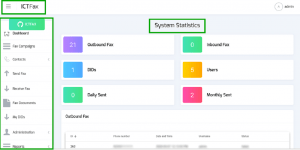
Dashboard is the first page will appear after splash screen that displayed to you menu bar on left side of
window and system statistics that has following buttons on top of page, from where you can see status
of each unit directly by clicking the buttons as shown below:
4: Admin configuration:……………………………………………………………………………………………………………..
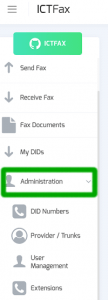
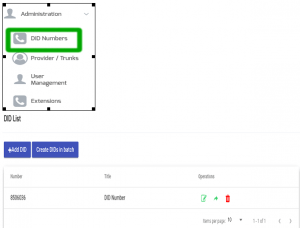
- Click on main menu “administration” at left side from menu-bar.
- Click on sub menu “system statistics”.
- Click on administration menu on left side from menu bar, following sub menus will appear:
- DID number
- Providers/Trunk
- User management
- Extensions.
Configuration of DID numbers:………………………………………………………………………………………………
- Click on the sub menu “DID number” button, a new page will appear on screen with
list of “DID,s” and details.
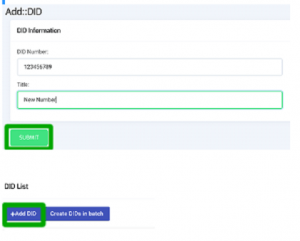
ADD new DID:…………………………………………………………………………………………………………………….
- Move the cursor on “Add DID” button on top left of “DID List”.
- Click on the “Add DID” button a pop-up form appears on the screen.
- Fill the required fields on form and click the “submit” button.
- New “DID number” will be displayed on the detail view once the record has been
saved.
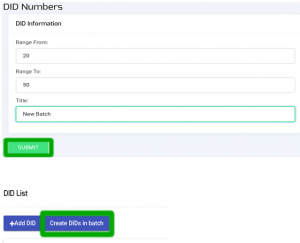
Create DID,s in Batch:…………………………………………………………………………………………………………..
- Move the cursor on “Create DID,s in batch” button on “DID list”.
- Click on “create batch” button, a pop-up form will appear on screen you can set range
of batch by writing in the text boxes and click the “submit” button.
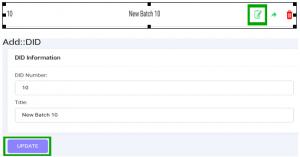
- You can edit the record by clicking the “pencil” button, a pop-up form will displayed
that contains all the options that are configurable in record and click the “update” button.
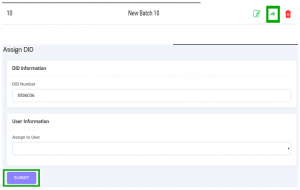
- You can assign “DID number” to user by clicking the “arrow” button, a pop-up form
will displayed on screen enter the required information about user to whom DID will be
assigned - Click the “submit” button.
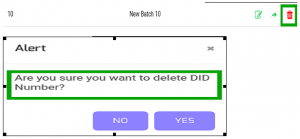
- Discard DID record from list by clicking “delete” button if required number need to delete.
- A pop-up appears on screen with confirmation message
- Click on “yes” to delete the selected record or Click on “no” to cancel the activity.
5: Extension Configuration:………………………………………………………………………………………………………..
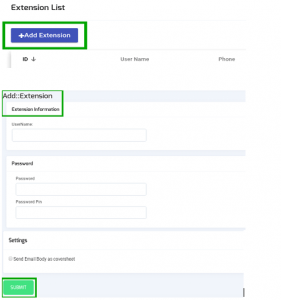
- To configure extensions click on “Extension” button from administration menu, a page appears on
screen with list of extension id,s and details.

To Add New Extension:…………………………………………………………………………………………………………
- Move the cursor on “Add extension” on top left of extension list
- Click on “Add extension” button to create new extension, a pop-up form appears on screen
fill the required information such as:- User-name
- password
- Email etc
- click on “Submit” button new extension detail will be displayed on the detail view once the
record has been saved.
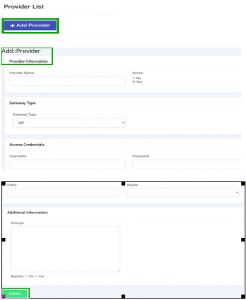
6: Provider/Trunks:……………………………………………………………………………………………………………………
- To configure providers click on “Provider/Trucks” button on left side from administration menu, a
page appears on screen with complete list of providers and their detail.
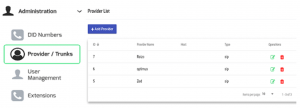
- To Add provider:
- Move the cursor on “Add provider” on top left of provider list
C2: lick o “Add provider” button to create “new provider”, a pop-up form will appear on screen
fill the required fields on form such as:- User-name
- gateway type
- password etc
- Click on “Submit” button new provider will be displayed on the detail view once the record
has been saved.
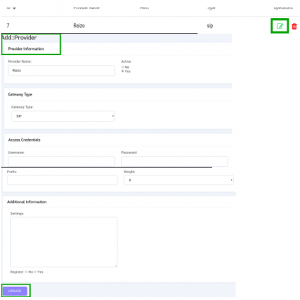
- Move the cursor on “Add provider” on top left of provider list
- You can edit the record display in the list by clicking “Pencil” button, a pop-up form
displayed on screen that will contain all options that are configurable.
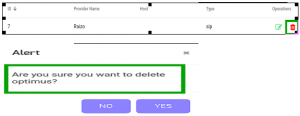
- You can discard provider details from the list by clicking the “Delete” button.
- A pop-up appears on screen with confirmation message.
- Click “Yes” to delete the selected record or click on “No” to cancel the activity.
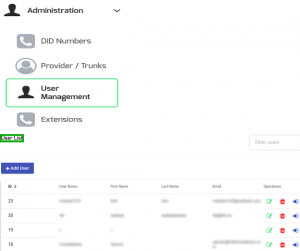
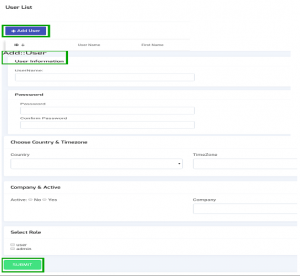
7: User Management:……………………………………………………………………………………………………………….
- To configure providers click on “User Management” button on left side from administration menu, a
page appears on screen with complete list of users and their detail.
- To Add User:
- Move the cursor on “Add User” on top left of user list, click on “Add User” button to create
“new user”, a pop-up form will appear on screen fill the required fields on form such as:- User-name
- Password
- Move the cursor on “Add User” on top left of user list, click on “Add User” button to create
- Country
- Time-Zone etc
- Click on “Submit” button new user will be displayed on the detail view once the record has been saved.
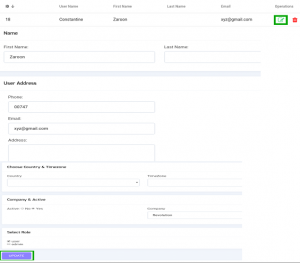
- You can edit user record by clicking the “pencil” button a pop-up window will displayed on screen, a pop-up will contains all options that are configurable.
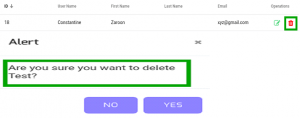
- To discard provider details from the list by clicking the “Delete” button.
- A pop-up appears on screen with confirmation message.
- Click “Yes” to delete the selected record or click on “No” to cancel the activity.
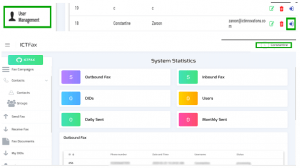
8. Switching to User Account:…………………………………………………………………………………………………..
You can directly switch to “User” account by clicking the “Login” button as shown below:
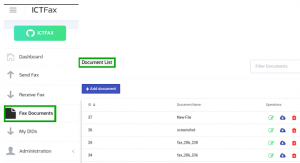
9: Fax Document:…………………………………………………………………………………………………………………….
- To send a fax, firstly you have to upload a file.
- To upload a file follow these steps:
- Move the pointer mouse to menu bar.
- Click on “Fax Document” button on left side from menu bar, a new page displayed on screen with list of uploaded documents as shown below:
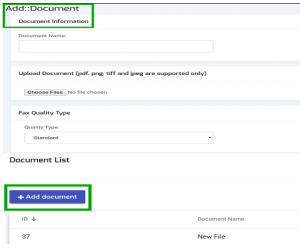
Add new Document:…………………………………………………………………………………………………………….
- New Document:
- Click on “Add Document” button on top left side of document list, a pop-up form will
appear on screen. Fill the required fields such as:
- Click on “Add Document” button on top left side of document list, a pop-up form will
- Document name
- Upload document
- For quality
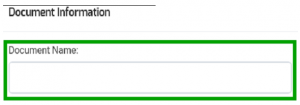
- Document name:
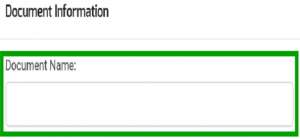
In the text box you give the name of document as shown below:- Upload Document:
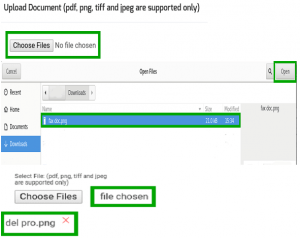
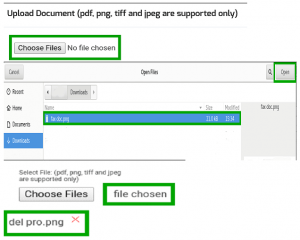
- To upload a new document.
- Click on “Choose Files” button.
- Select document dialog box will appear on screen.
- Navigate to the location of file of your computer.
- Select the file from your computer.
- You can open the file by double clicking or select a file and click the “open” button, file will
be uploaded on page as shown below:
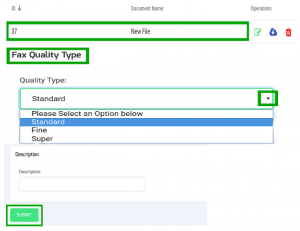
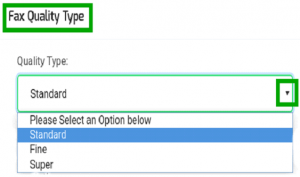
- For quality type:
- Click on “Text bar” a drop down list will opened.
- Select one option from the list and click the “submit” button, new file will be displayed on the detail view once a file has been uploaded.
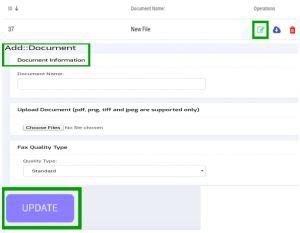
- You can edit the document information by clicking “pencil” button, a pop-up form willdisplayed on screen, pop-up contains all options that are configurable.
- You can either download any file from document list by clicking “cloud” icon on right side
on page.

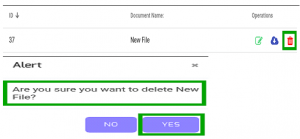
- You can discard a file from list by clicking “delete” button, a pop-up appear on screen with a
confirmation message. - Click “Yes” to delete the selected file or Click “No” to cancel the activity as shown below:
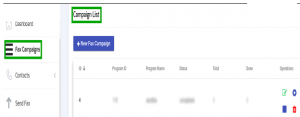
10. Fax Campaigns:………………………………………………………………………………………………………………….
- Click on “Fax Campaign” menu button from main menu, a window container will on screen that display list of campaigns as show below:
 #
#
To configure campaign settings:…………………………………………………………………………………………….
- Click on “Pencil” button/icon, a pop-up form will on screen that contain all configurable fields such as:
- Document: Click on “Drop-Down” button, select document/file from list.
- Retry: Set retry clock time to send message.
- Delay: Set time value for delay between in minute.
Click on “Update” button to save the changes.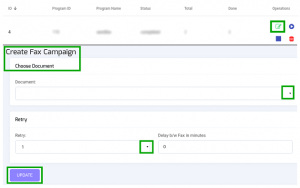
- Click on “Play” icon to start campaign.

- Click on “Stop” button to stop campaign.

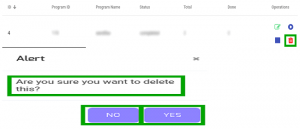
- Click on “Delete” button to discard any record from list, a pop-up will appear on top of the page with confirmation message.
- Click on “Yes” button to delete the record or click “No” to remain same changes.
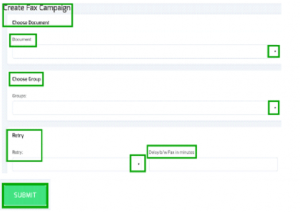
To Create New Fax Campaign:……………………………………………………………………………………………..
- Click on “New Fax Campaign” button, a pop-up form will appear that contains required
fields such as:- Choose Document: Click on “Drop-Down” button to select a document/file from list.
- Choose Group: Click on “Drop-Down” button to select group from list.
- Retry: Set retry clock time to send message.
- Delay: Set time value for delay between in minute.
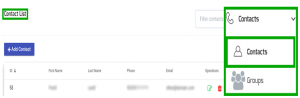
11. Contacts:……………………………………………………………………………………………………………………………
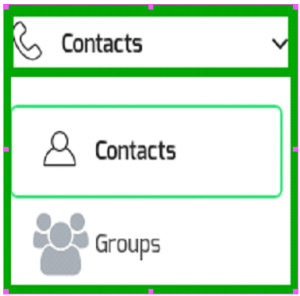
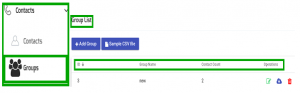
- Click on “Contacts” menu button from main menu, following sub-menus will appear as shown below:
- Click on “Contacts” sub-menu from menu, a window container will appear on screen that contain list of contacts as show below:
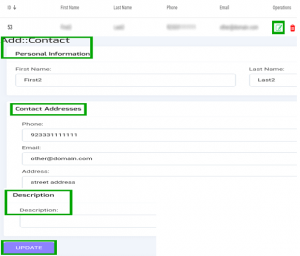
To configure user information:………………………………………………………………………………………………
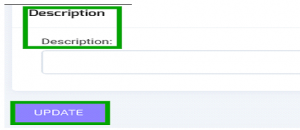
- Click on “Pencil” button, a window form will appear on screen that contain are configurable
fields such as:- Personal Information
- Contact Addresses
- Description etc
- Click on “Update” button to save the changes.
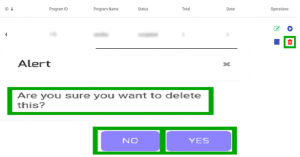
- Click on “Delete” button to discard any record from list, a pop-up will appear on top of the page
with confirmation message. - Click on “Yes” button to delete the record or click “No” to remain same changes.
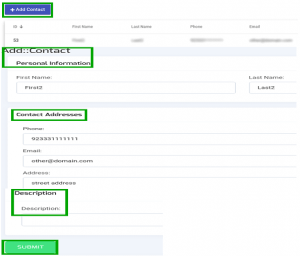
To Create New Contact:……………………………………………………………………………………………………….
- Click on “Add Contact” button, a window form will appear on screen that contain required
fields, fill the specified fields to add new contact such as:- Personal Information
- Contact Addresses
- Description etc
- Click on “Submit” button to complete the activity.
• Groups:
- Click on “Groups” sub-menu from menu, a window container will appear that contain group list as shown below:
To Edit group information:……………………………………………………………………………………………………
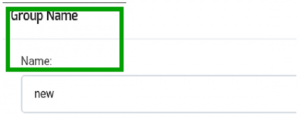
- Click on “Pencil” button, pop-up form will appear on screen that contains all configurable fields such as:

- Group Name: Write the group name in text box.
- Upload CSV file:
- To upload new document to fax.
- Click on “Choose Files” button, a select document dialog box appear on
screen. - Navigate to the location of file on your computer.
- Double click or select a file to upload and click on “Open” button, file will be
uploaded on page, a new file will be added in the drop-down list.

- Description: Write group description in text box.
- Click on “Update” button to save the changes.

- Click on “Cloud” icon to download group information.

- Click on “Delete” button to discard any record from list, a pop-up will appear on top of the page with confirmation message.
- Click on “Yes” button to delete the record or click “No” to remain same changes.

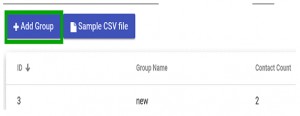
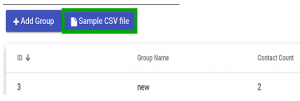
To Create New Group:………………………………………………………………………………………………………….
- Click on “Add Group” button, a pop-up form will on screen that contain all required fields, fill the specified fields such as:
- **Group Name:** Write the group name in text box.
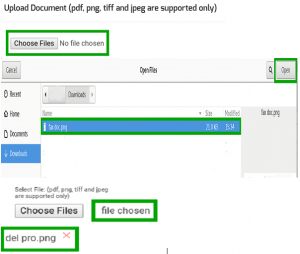
- **Upload comma-separated values (CSV) file:**- To upload new document to fax.
- Click on “Choose Files” button, a select document dialog box appear on screen.
- Navigate to the location of file on your computer.
- Double click or select a file to upload and click on “Open” button, file will be uploaded on page, a new file will be added in the drop-down list.
- Description: Write group description in text box.
- Click on “Submit” button.
- Click on “Same CSV File” button to save the group comma-separated values (CSV) file.
12: To send Fax:………………………………………………………………………………………………………………………
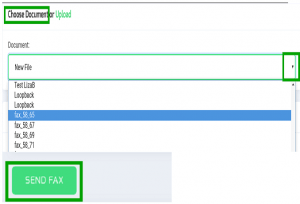
• Send Fax:
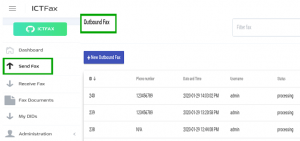
- Click on “Send Fax” button from menu bar, a new page opens on screen with list of outbound
fax and details as shown below:
• Add Document:
- Move the cursor on “New Outbound Fax” on top left of outbound fax page.
- Click on “New Outbound Fax” button, a pop-up form will appear on screen, name with “send
fax document program”. Fill the required fields such as:- Document Title
- Choose Document or Upload
- Destination number etc
- Document Title: To write the title of file in the text box as shown below:
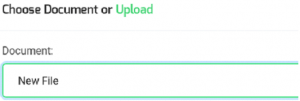
- Choose Document or Upload:
- Click on “Document Text box”, a drop down list opens with all uploaded files.
- Select one option from list and give the destination number in text box.
- Click the “Send Fax” button.
- You can also upload new file by clicking the “Upload” button, a pop-up form will appear on
screen name with upload document, fill the required fields such as:- Document name
- Quality type
- Choose file etc
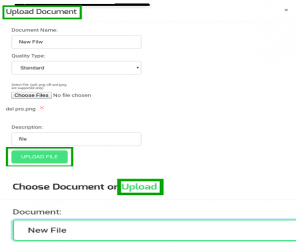
- Document name: You can write the name of document in text box.
- Upload Document:
- To upload new document to fax.
- Click on “Choose Files” button, a select document dialog box appear on screen.
- Navigate to the location of file on your computer.
- Double click or select a file to upload and click on “Open” button, file will be uploaded on page, a new file will be added in the drop-down list.
- Fax Quality:
- Click on “Text bar” a “drop down” list will open.
- Select one option from list click the “upload file” button.
- New sended fax will be displayed on “outbound fax list” once fax has been sent as shown below:

12. Receive Fax:
- Click on “Receive Fax” button from menu bar, a new pop-up form will appear on screen, name with
“inbound fax”.- Pop-up form will contains list of all incoming fax and detail.
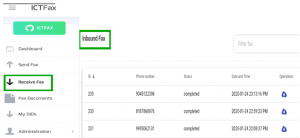
- You can either download you fax from “inbound fax list”.
- Click on “Cloud” icon on right side of page, a file will be saved automatically in you computer drive.

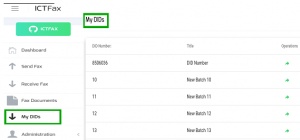
13. My DID,s:
- Move the cursor to “My DIDs” on left side from menu bar.
- Click on “My DIDs” button from menu bar.
- A new pop-up form appears on screen with list of all DID number,s.
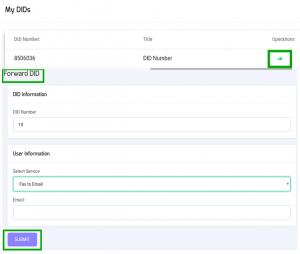
-
You can forward the DID number to selected user by giving required information that are following
such as:- DID information
- User information
- Select service
- Email etc
-
When specified field are entered in text boxes.
-
Click the “Submit” button.
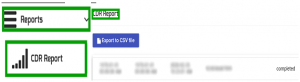
14. Reports:
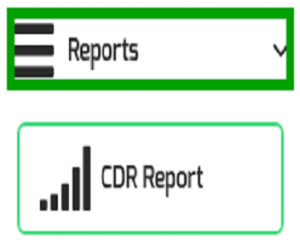
- Click on “Reports” menu button from main menu, a sub-menu will appear such as:
- Click on “CDR” sub-menu, a window container will appear that contain campaign detail report as shown below:
- Click on “Export to CSV file” to download the report: